

Aspire & Dev Containers Demo
| Time to Read: 11 mins
#Apire
Aspire aims to simplify development by providing tooling, templates & orchestrating local setup of multi-app applications. This reduces time and complexity of setting up locally to just click run, and re-uses this idea with running ethereal environments for integration tests.
The framework broken up to 3 components:
- Orchestration: A layer tackling app composition, service discovery & connection string configuration automatically. It does this by spinning up containers, cloud resources or processes with lifecycle dependencies, then registering each one with service discovery and providing environment variables to each running app.
- Integrations: Allow developers to add services they require for their application to run in an extensible form.
- Tooling: Using opinionated production-ready defaults, your app runs with Aspire and should work out of the box, even providing templates with everything setup. Defaults include OpenTelemetry, service discovery and health checks.
All of this will spit out an Aspire manifest used to run your multi-app application locally and be used to automatically deploy to the cloud (Azure or AWS only atm).
⚠️ .NET Aspire is on it’s own release cycle, separate from .NET and is changing significantly between minor versions.
#Demo - .NET Aspire Application
- To setup .NET Aspire you’ll potentially need to update your Visual Studio 2022 and install Aspire .NET project templates:
dotnet new install Aspire.ProjectTemplatesif you have both Docker and Podman installed, you’ll need to specify which one Aspire orchestrator should use, otherwise if you only have 1 installed, Aspire will automatically detect it and use it to run containers:
# Mac/Linuxexport DOTNET_ASPIRE_CONTAINER_RUNTIME=podman# orexport DOTNET_ASPIRE_CONTAINER_RUNTIME=docker
# Windows[System.Environment]::SetEnvironmentVariable("DOTNET_ASPIRE_CONTAINER_RUNTIME", "podman", "User")# or[System.Environment]::SetEnvironmentVariable("DOTNET_ASPIRE_CONTAINER_RUNTIME", "docker", "User")- Using Visual Studio 2022, you can create a new .NET Aspire application with the newly installed Aspire project template:

or for existing projects, you can right click on your host project and simply add .NET Aspire support, which’ll create the Aspire AppHost project and add the tooling defaults through Dependency Injection:
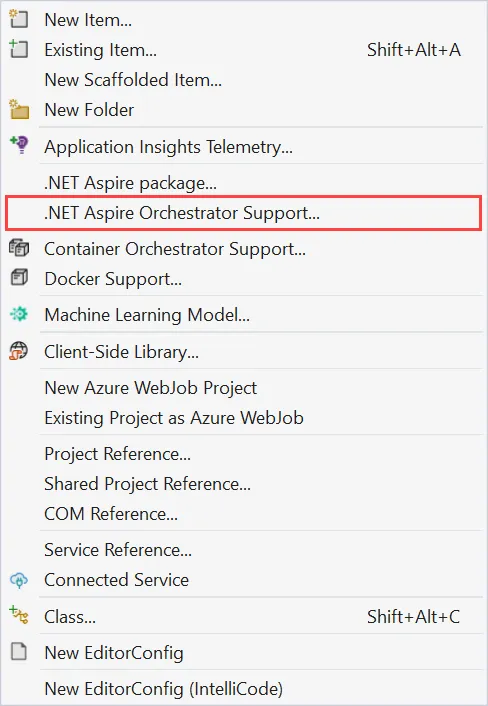
N.B. If you’re creating a new app, you can also use VS Code C# Dev Kit or the dotnet cli. Instructions are found here.
- Run your Aspire application by running the AppHost project:
# Create a .NET self-signed cert for HTTPs, you only need to run oncedotnet dev-certs https --trust
dotnet run --project .\[Your App Name].AppHost
# Click on the link Login to the dashboard at https://localhost:17073/login?t=XXX
We can also check out the manifest Aspire generates, this is the context of how to run your application: dotnet run --project .\[Your App Name].AppHost --publisher manifest --output-path ../aspire-manifest.json:
{ "$schema": "https://json.schemastore.org/aspire-8.0.json", "resources": { "apiservice": { "type": "project.v0", "path": "ExampleApp.ApiService/ExampleApp.ApiService.csproj", "env": { "OTEL_DOTNET_EXPERIMENTAL_OTLP_EMIT_EXCEPTION_LOG_ATTRIBUTES": "true", "OTEL_DOTNET_EXPERIMENTAL_OTLP_EMIT_EVENT_LOG_ATTRIBUTES": "true", "OTEL_DOTNET_EXPERIMENTAL_OTLP_RETRY": "in_memory", "ASPNETCORE_FORWARDEDHEADERS_ENABLED": "true", "HTTP_PORTS": "{apiservice.bindings.http.targetPort}" }, "bindings": { "http": { "scheme": "http", "protocol": "tcp", "transport": "http" }, "https": { "scheme": "https", "protocol": "tcp", "transport": "http" } } }, "webfrontend": { "type": "project.v0", "path": "ExampleApp.Web/ExampleApp.Web.csproj", "env": { "OTEL_DOTNET_EXPERIMENTAL_OTLP_EMIT_EXCEPTION_LOG_ATTRIBUTES": "true", "OTEL_DOTNET_EXPERIMENTAL_OTLP_EMIT_EVENT_LOG_ATTRIBUTES": "true", "OTEL_DOTNET_EXPERIMENTAL_OTLP_RETRY": "in_memory", "ASPNETCORE_FORWARDEDHEADERS_ENABLED": "true", "HTTP_PORTS": "{webfrontend.bindings.http.targetPort}", "services__apiservice__http__0": "{apiservice.bindings.http.url}", "services__apiservice__https__0": "{apiservice.bindings.https.url}" }, "bindings": { "http": { "scheme": "http", "protocol": "tcp", "transport": "http", "external": true }, "https": { "scheme": "https", "protocol": "tcp", "transport": "http", "external": true } } } }}Read more on how the manifest works here.
- To deploy to the cloud, we can leverage Aspire and it’s context on how our application links together and generates a manifest of it to deploy to Azure. Using the Aspire manifest we can deploy by:
a) Deploy to Azure Containers using the Azure Developer CLI (azd) which’ll translate the manifest into Azure Bicep (you can also convert Bicep to Terraform using Azure Terrafy)
b) Deploy to Kubernetes using Aspir8 which’ll translate the manifest to Kubernetes manifest
- We can also add integration/functional tests into XUnit, NUnit or MSTest test project and reference the Aspire project to build. This will then go and spin up the project locally, again in containers and processes using the Aspire orchestrator + service discovery, to allow your test to hit endpoints and run test cases against.
We do this by utilizing DistributedApplicationTestingBuilder like so:
public class IntegrationTest{ [Fact] public async Task GetWebResourceRootReturnsOkStatusCode() { // Arrange var builder = await DistributedApplicationTestingBuilder .CreateAsync<Projects.AspireApp_AppHost>();
builder.Services.ConfigureHttpClientDefaults(clientBuilder => { clientBuilder.AddStandardResilienceHandler(); });
await using var app = await builder.BuildAsync();
await app.StartAsync();
// Act var httpClient = app.CreateHttpClient("webfrontend");
using var cts = new CancellationTokenSource(TimeSpan.FromSeconds(30)); await app.ResourceNotifications.WaitForResourceHealthyAsync( "webfrontend", cts.Token);
var response = await httpClient.GetAsync("/");
// Assert Assert.Equal(HttpStatusCode.OK, response.StatusCode); }}This means anything you change infrastructure-wise for you local development will automatically be part of your integration test! .NET Aspire tries to be as feature parity as test containers.
#.NET Aspire From Examples
Again Aspire is way of specifying resources and their linked services, which can either run as a containers or processes. When an Aspire project starts, it will spin up a few internal process which are used to communicate for service discovery and sending events such as X app has started. The eventing process is known as Developer Control Plane (DCP), which send events which are used by tooling such as IDE’s to attach debuggers.
Another process which internally spun up is the Aspire application orchestration providing the context of dependency graph between services and their linkage, e.g. connection string. This is what we specify through writing code in our AppHost Aspire project. Let’s dig into this project further with examples:
#Example - Run Project
var builder = DistributedApplication.CreateBuilder(args);
builder.AddProject<Projects.Web_App>("webapp") .WithExternalHttpEndpoints();
builder.Build().Run();This is the most minimal example of a project we have which does not have any dependencies. However, it’s critical we understand we can create an Aspire DistributedApplication builder, which is a type safe way to add resources to our context.
We initially add another project reference with a resource name webapp and expose HTTP endpoints, which specify this app has HTTP/S endpoints. AddProject and AddAzureFunctionsProject are special as they are references to projects on your filesystem, which Aspire orchestrator will use to start the given project(s) as .NET processes with debugging inspection if you run with debug configuration. This means when we run our Aspire project we can still hit debugger breakpoints in our given project(s). Any resources which run as a container will not be have debugger attached. When you stop your Aspire project, it’ll tear down all the containers and processes which it launched.
#Example - Function App w/ Emulated Az Storage
using Aspire.Hosting.Azure;using Azure.Provisioning;using Azure.Provisioning.Storage;
var builder = DistributedApplication.CreateBuilder(args);
var storage = builder // Note we're naming our resource as "storage", but it can // be named anything .AddAzureStorage("storage") .RunAsEmulator() .ConfigureInfrastructure((infrastructure) => { var storageAccount = infrastructure.GetProvisionableResources().OfType<StorageAccount>().FirstOrDefault(r => r.BicepIdentifier == "storage") ?? throw new InvalidOperationException($"Could not find configured storage account with name 'storage'");
// Storage Account Contributor and Storage Blob Data Owner roles are required by the Azure Functions host var principalTypeParameter = new ProvisioningParameter(AzureBicepResource.KnownParameters.PrincipalType, typeof(string)); var principalIdParameter = new ProvisioningParameter(AzureBicepResource.KnownParameters.PrincipalId, typeof(string)); infrastructure.Add(storageAccount.CreateRoleAssignment(StorageBuiltInRole.StorageAccountContributor, principalTypeParameter, principalIdParameter)); infrastructure.Add(storageAccount.CreateRoleAssignment(StorageBuiltInRole.StorageBlobDataOwner, principalTypeParameter, principalIdParameter));
// Ensure that public access to blobs is disabled storageAccount.AllowBlobPublicAccess = false; });var blobs = storage.AddBlobs("blobs");var queues = storage.AddQueues("queues");
var functions = builder.AddAzureFunctionsProject<Projects.ImageGallery_Functions>("functions") .WithReference(queues) .WithReference(blobs) .WaitFor(storage) .WithHostStorage(storage);
builder.AddProject<Projects.ImageGallery_FrontEnd>("frontend") .WithReference(queues) .WithReference(blobs) .WaitFor(functions) .WithExternalHttpEndpoints();
builder.Build().Run();Here we can see we create a DistributedApplication build, which is a resource builder context. We can then attach our resources, with builder.AddAzureStorage("storage").RunAsEmulator() we created an emulated Azure storage resource that is added to the Aspire context and we can then get the returned Azure storage resource and use it as a connection string for our function app using .WithReference(storage).
We can also subscribe to Aspire’s eventing application lifecycle system to control the dependencies of our application, as we need our storage container to be running and healthy before we try starting the app which connects to it with .WaitFor(storage).
We can even add resources to other resources, for instance we can add blobs to our storage resource like so: storage.AddBlobs("blobs").
Finally, builder.Build().Run(); will create our manifest and execute to create our apps in our dependency order we’ve specified.
As mentioned before AddProject and AddAzureFunctionsProject run as .NET processes on our machine; here we pass connection strings to azure storage or HTTP endpoints to our project as environment variables, via Aspire’s service discovery, when those processes start. Think that this is similar to how we can specify environment variables for our process via launchSettings.json.
#Example - Build and Run a Dockerfile
var goVersion = builder.AddParameter("goversion");
var ginapp = builder.AddDockerfile("ginapp", "../ginapp") .WithBuildArg("GO_VERSION", goVersion) .WithHttpEndpoint(targetPort: 5555, env: "PORT") .WithExternalHttpEndpoints();Here we can see we can add a Dockerfile which’ll build and run as a container with your container runtime. Additionally, we can specify an endpoint we want to expose from inside the pod for us to call.
We can also see we can create parameters into our context and pass it through to our resources.
#Example - Run a Custom Image
builder .AddContainer("redis", "redis") .WithImageTag("7.1") .WithImageRegistry("myregistry.azurecr.io");Here we can see we can pull and run a specific container image when our Aspire orchestrator runs and add it our context. By default containers will selection the latest tagged image, which is great for local development when you want to run another service where you want all the latest functionality.
#Conclusion
There are many positives for using Aspire for development productivity and quality checking:
- We have an ethereal environment which spins up and tears down things from scratch, which is made more productive with data seeding.
- We no longer have to fiddle with multi-project start up configuration.
- We no longer have to setup our environment variables/appSettings/launchSettings to configure our application to run locally and connect to services.
- Repeatable development start up experience with all app configured.
- Re-useable setup for integration testing, anything created for local development is re-used for integration testing, reducing duplication of effort.
- Flexibility to run custom container images and Dockerfiles.
Prior to Aspire you’d have to setup something like Docker Compose | Docker Docs and Testcontainers, but that wouldn’t link up with your local development launch like Aspire. The Java world has had this ability in Springboot for a while now but it is much more coupled to your application, whereas, Aspire is far more decoupled and not interfering with how you actually want to run and deploy your application in a production environment.
There is still much development going on in Aspire which could be seen as volatile and the tooling may break as it might not be keeping up to date with all the latest functionality. Additionally, the Microsoft team are still working out ways of how to deploy an Aspire application, however, if you utilise the manifest file, you can generate what you need.
Overall, all the benefits far outweigh any trade-offs for not using it in my mind. There also may be limitations to what you can do and how much you can run, but you need to factor that into building your service anyways. Here is an article from the Xbox team explaining how it’s making their development life better: Xbox + .NET Aspire: Transforming Local Development Practices - .NET Blog
#Dev Containers
Dev containers is an implementation of the Dev Container Spec which aims to simplify repeatable setup of local development environments and locally develop of your application without having to setup locally any required software for other developers whom may not have a full working knowledge of what is required to run your application, all in a container for an ethereal development environment.
A development environment is specified using a .devcontainer/devcontainer.json file in order to create a Docker or Podman container with a pre-built or custom Dockerfile.
Not that dev containers can largely be used with VS Code or GitHub Codespaces.
#Demo - Creating a .NET dev container
This demo assumes you’re running windows but you can complete it in similar actions for MacOS and Linux.
Pre-requisites:
Install Podman (an alternative to Docker): Podman Releases (use brew for MacOS or Linux or your linux distro package manager)
Run Podman:
podman machine initpodman machine start# Check Podman is runningpodman infopodman ps- Install Dev Containers VS Code Extension:
code --install-extension ms-vscode-remote.remote-containers- Update VS Code Ext Dev Containers to use Podman, using the UI
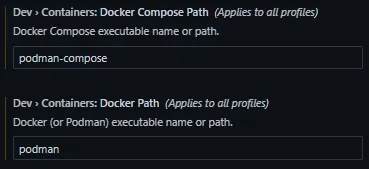
or using the JSON settings directly:
{ "dev.containers.dockerPath": "podman", "dev.containers.dockerComposePath": "podman-compose"}- Run a basic Alpine & git dev container from vscode command palette (
ctrl/cmd+p):
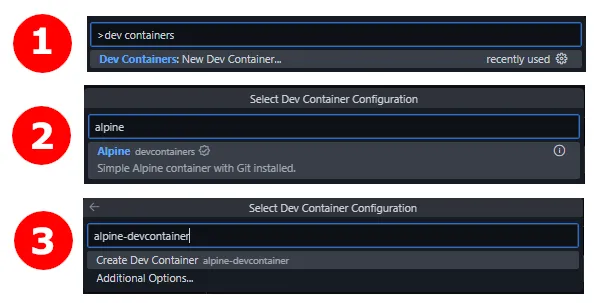
After a bit of spin up time, running the podman ps command from your terminal should show the pod your VS Code is connected into using a remote VS Code server.

- Install C# Dev Kit VS Code Extension:
code --install-extension ms-dotnettools.csdevkit- Install .NET SDK:
sudo apk update && \ sudo sudo apk add dotnet8-sdkNow we’d be able to develop our .NET application in your container. However, when you spin it down, you’ll have to do the same actions all over again, not very repeatable or a great experience. To avoid this we can use a container image with the .NET version already installed in the image and install the extensions automatically by updating our devcontainer.json:
{ // ... "image": "mcr.microsoft.com/devcontainers/dotnet:8.0-bookworm",
"postCreateCommand": "dotnet restore",
"customizations": { "vscode": { "extensions": [ "ms-dotnettools.csdevkit" ] } } // ...}The above container spec will spin up an image with .NET 8 SDK already installed, install C# dev kit vscode extension and even run restore when the container is created!
#Resources
- VS Code | Developing inside a Container
- Introduction to dev containers - GitHub Docs
- Development containers
- Development Container Specification
- .NET Aspire overview - .NET Aspire | Microsoft Learn
- Aspir8 | Aspir8: Aspire to Deployments
- devkimchi/aspir8-from-scratch: Let’s deploy Aspire-flavoured apps to a Kubernetes cluster.
- .NET Aspire deployments - .NET Aspire | Microsoft Learn
- Write your first .NET Aspire test - .NET Aspire | Microsoft Learn
- How .NET Aspire Simplifies Service Discovery
- dotnet/aspire-samples